Quick Start Guide
This is a guide to get you started with building a roster that meets the needs of your centre and staff.
The main options and features are covered here
There are further details of these functions and more advanced configurations in the reference guide.
Setting up
Make a copy of the roster and rename it with the new roster date.
In the model browser, take a copy of the base roster by selecting it and then using the Copy and Paste options from the Edit menu. You can also use the Duplicate function from the right-click menu.
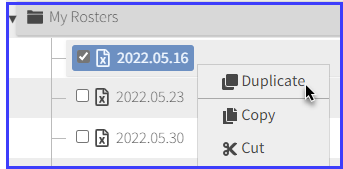
Then rename it and change the name to reflect the date of the new week.
Tip: Using a naming format of YYYY.MM.DD e.g. 2022.01.17 will keep rosters in date order.
Administrators only - Configure the centre
Administrators should configure the centre using the Administration Training Guide to go through each view and change the settings as needed.
Data
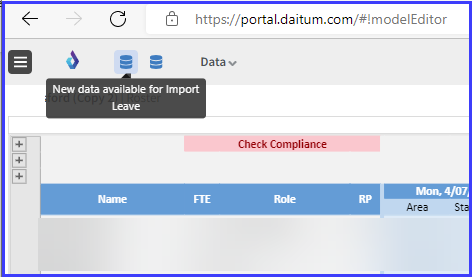
The Data Import (Blue Hamburger) icons appear when there is new data that needs to be brought in.
They are
Import Payroll - refreshes the Payroll view with the latest staff details
Import Leave - refreshes the Leave view with the latest staff details
Import SISO - brings in the latest Sign In and Sign Out data from the last 4 weeks
Import Planned Attendance - brings in the planned attendance numbers from QikKids or Kidsoft based on the week of the roster in the main roster view.
Click each of these icons to update the data and then they will disappear to indicate that the action has been performed and no new data is available to be brought in.
These options can always be performed from the Data menu if the toolbar has already disappeared.
Staff
Check and update staff member details
Review and update Staff Payroll data.
Select the Staff group

and then the Payroll view.
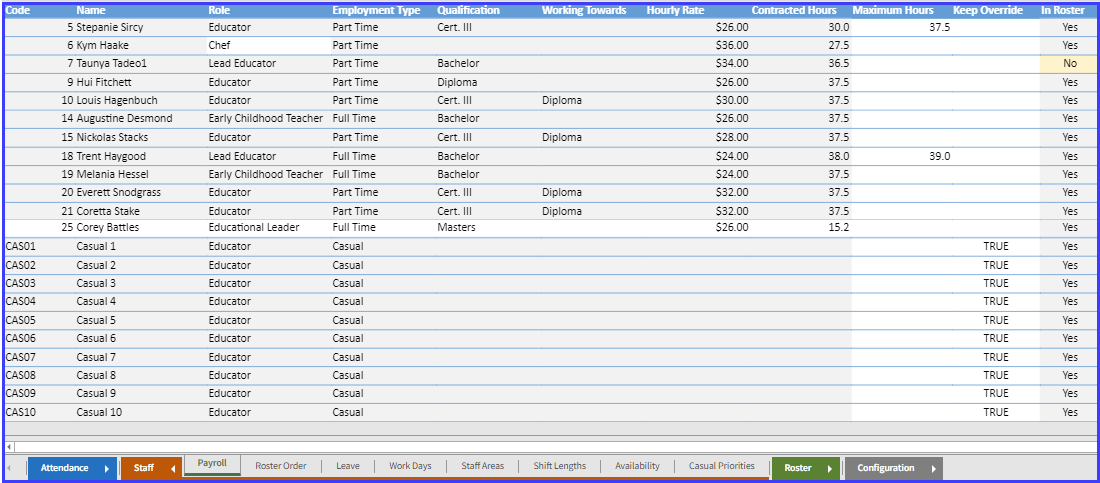
If there are casuals listed at the bottom of the roster, these should not be edited or deleted unless instructed.
Check the following details:
Anyone not at your centre anymore
Anyone who joined but is not listed
Are the hours correct for part-time staff?
Contracted Hours are the number of hours the person can work (or minimum for part-time workers, if a maximum is also set)
Maximum Hours are the most they can work (used for part-time workers only, this can be left blank)
Any missing qualifications
Make any adjustments needed.
Setting the Roster layout
The Roster Order View allows you to arrange the roster layout so that it is laid out and ordered in the way you prefer to see it.
Staff can be grouped by room or by casuals and permanents or alphabetically or in any other order.
Select the Staff group

and then the Roster Order view.
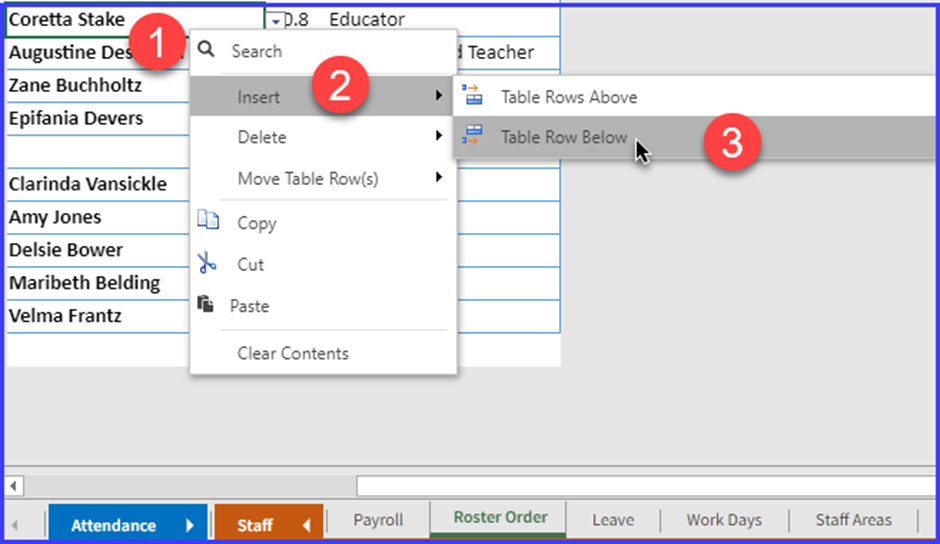
Names can be moved via a right-click menu as shown below.
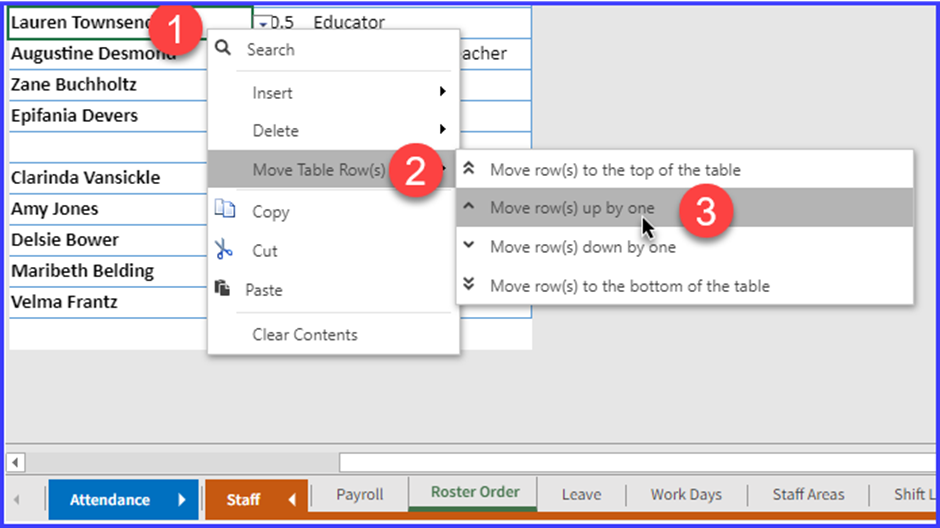
They can also be cut/copied and pasted to move their position in the roster.
Names can also be swapped or replaced by simply changing them with a different name in the drop down menu. If a name appears in red, it means they appear twice on the roster order and one of them should be changed or removed.
Alternatively, if making a lot of changes, you may want to copy the names into Excel in a blank spreadsheet to re-arrange them and then copy and paste them back into Daitum as shown below.
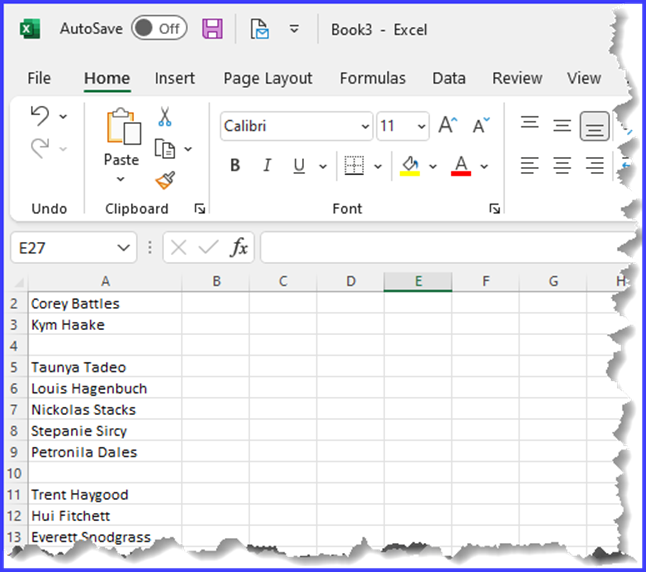
See this guide for more information:
Changing the roster layout
Each week, as a result of importing payroll data, there may be new staff added or former staff removed from Daitum.
Remove staff from the Roster layout who are not currently working at the centre.
To do this, check carefully for entries like these with #N/A which indicate that the person does not appear on the payroll.
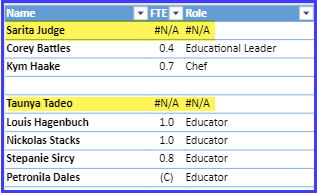
Select their name and press the delete key or delete the row by selecting the name and right-clicking and selecting Delete -> Table Rows.

Also, add any staff who are not yet on the Roster Order who should appear on the roster and should be given shifts.
These will be any staff on the Payroll view which have the “In Roster” column set to No. Do not try and update this field, it is just an indicator.
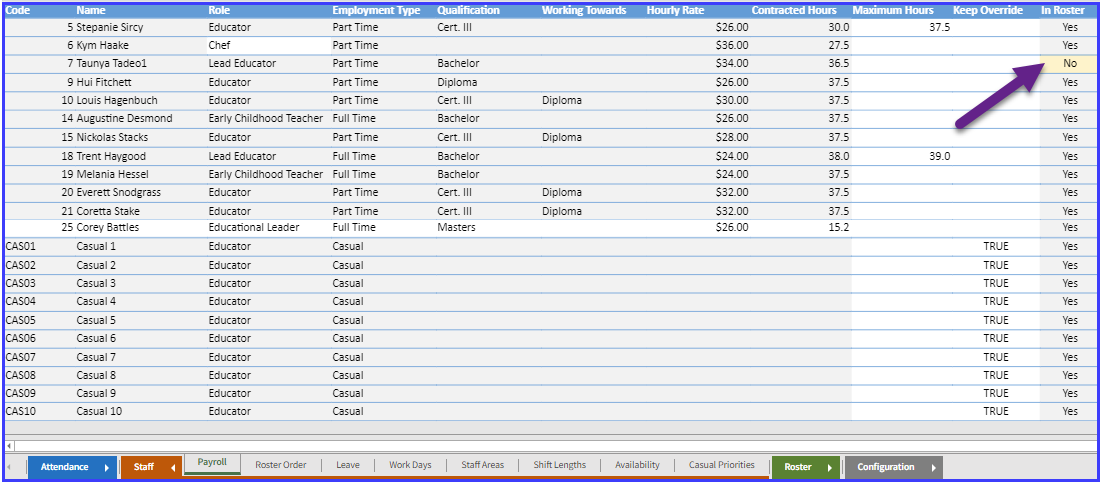
Adding the people to the Roster Order view will automatically change this to show Yes.
To do this, go to the Roster Order and select an empty space and use the drop-down and scroll to find the person you want to add.
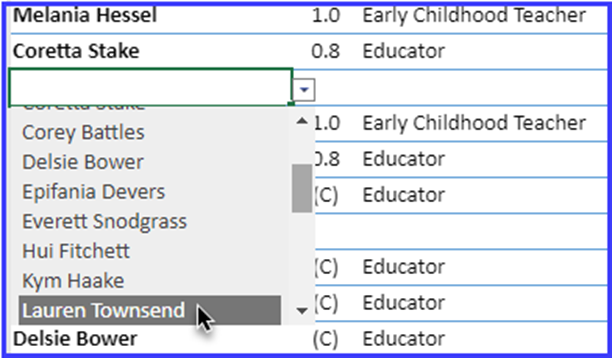
If there are no empty spaces you can add one by selecting a name and then using the right-click menu options to Insert a Table Row Above or Below.
Important: update the roster layout
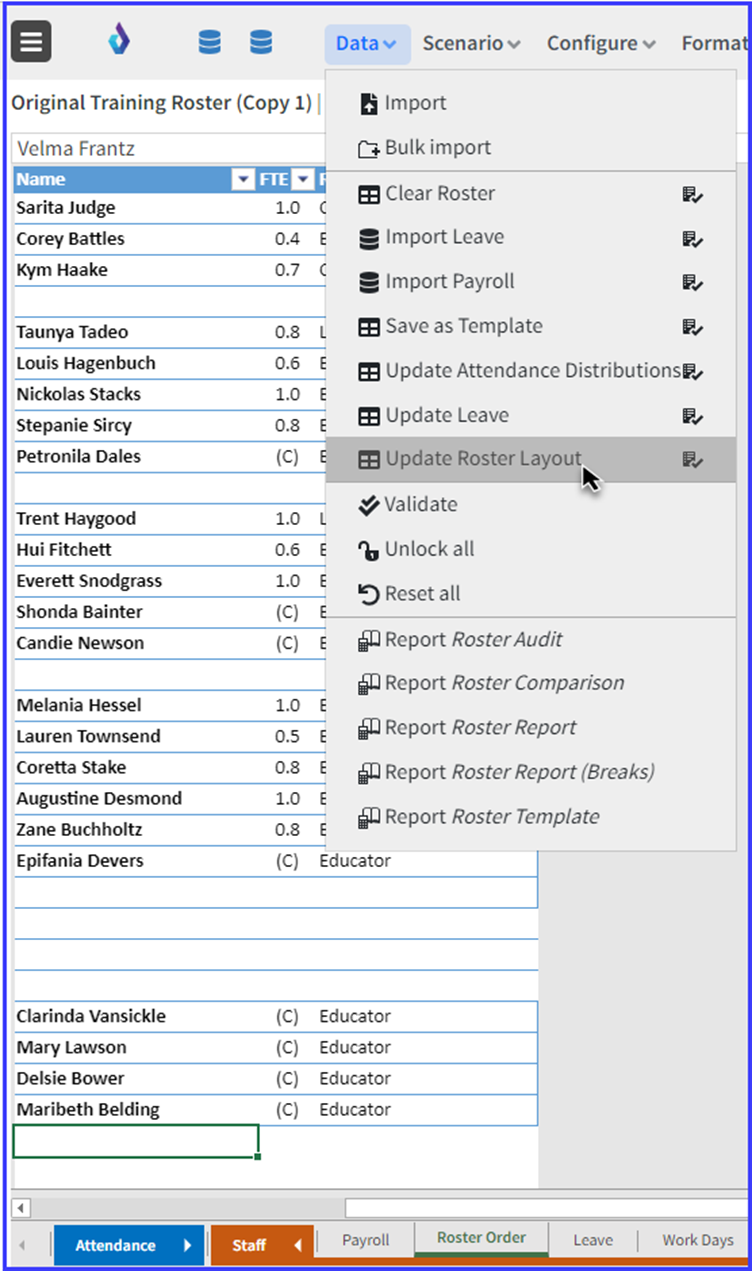
Áfter making any changes to the roster layout, you will need to run the update the Update Roster Layout process.
This can be easily done by selecting Update Roster Layout from the Data menu.
Allocating staff members to preferred areas
Allocate a staff member to work in a specific room or set preferences for which rooms staff members should be ideally allocated to by the system.
Select the Staff group

and then the Staff Areas view.
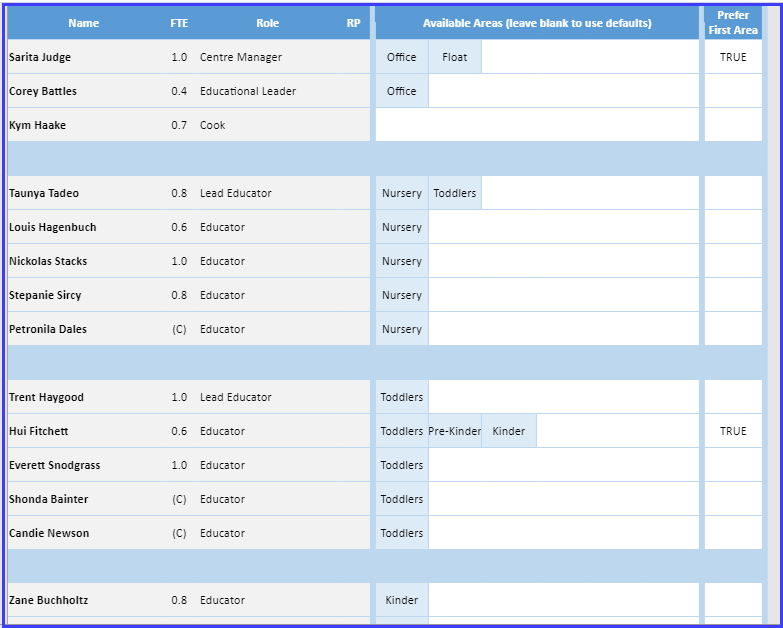
Enter one or more rooms that a staff member can work in. Select Float for any staff who can spend time in different rooms throughout the day. If no room is selected for a staff member (left blank) then they may be allocated to any room.
Set Prefer First Area to TRUE if the staff member should be given the first preference as opposed to being given equal consideration for any of the specified rooms.
More information about Floats can be found here: Frequently Asked Questions | What-are-Floats?
Review staff leave
If necessary, add, edit or delete any leave entries for staff members, so they will not be rostered on for any leave days they have and they will show on the roster as being on leave.
Select the Staff group

and then the Leave view.

If there is an import leave icon visible on the toolbar, click it to bring in payroll details from an external system.
If there is any leave here where the staff member is only away for part of the day, delete the entry. Daitum only caters for full days of leave.
Any leave in the past or future can be either deleted or just ignored.
Setting up regular working and non-working days for staff
Enter any days that staff usually don’t work, so they won’t be rostered on that day.
Select the Staff group

and then the Work Days view.
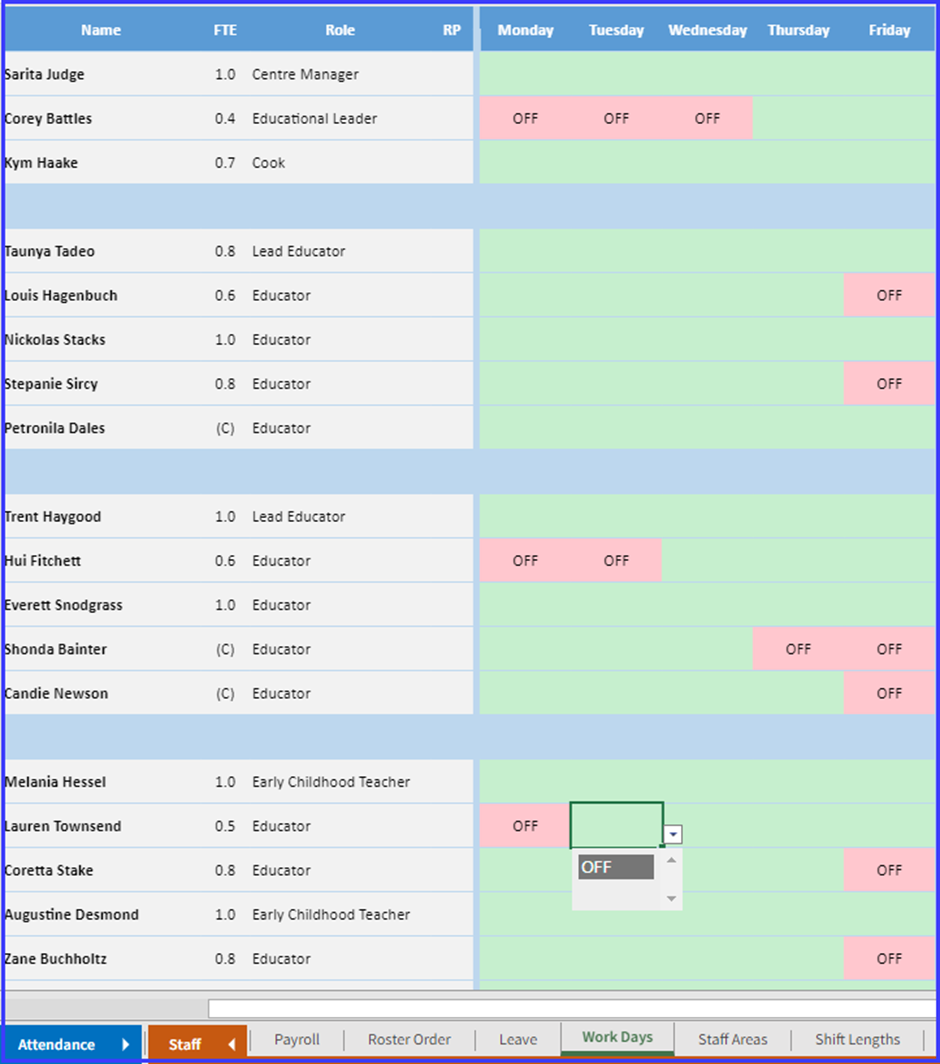
Use the drop-down menu and select OFF for any days a staff member does not work.
You can also select and then press the Delete key on an OFF entry to change it back to green.
Entering any custom shift lengths, break lengths and preferred start times
Cater for a specific staff member’s needs by setting the preferred start time as well as the shift lengths and break lengths for staff where it differs from the default. Default shift and break length settings for all staff are found in the Configuration → Defaults view.
Select the Staff group

and then the Shift Lengths view
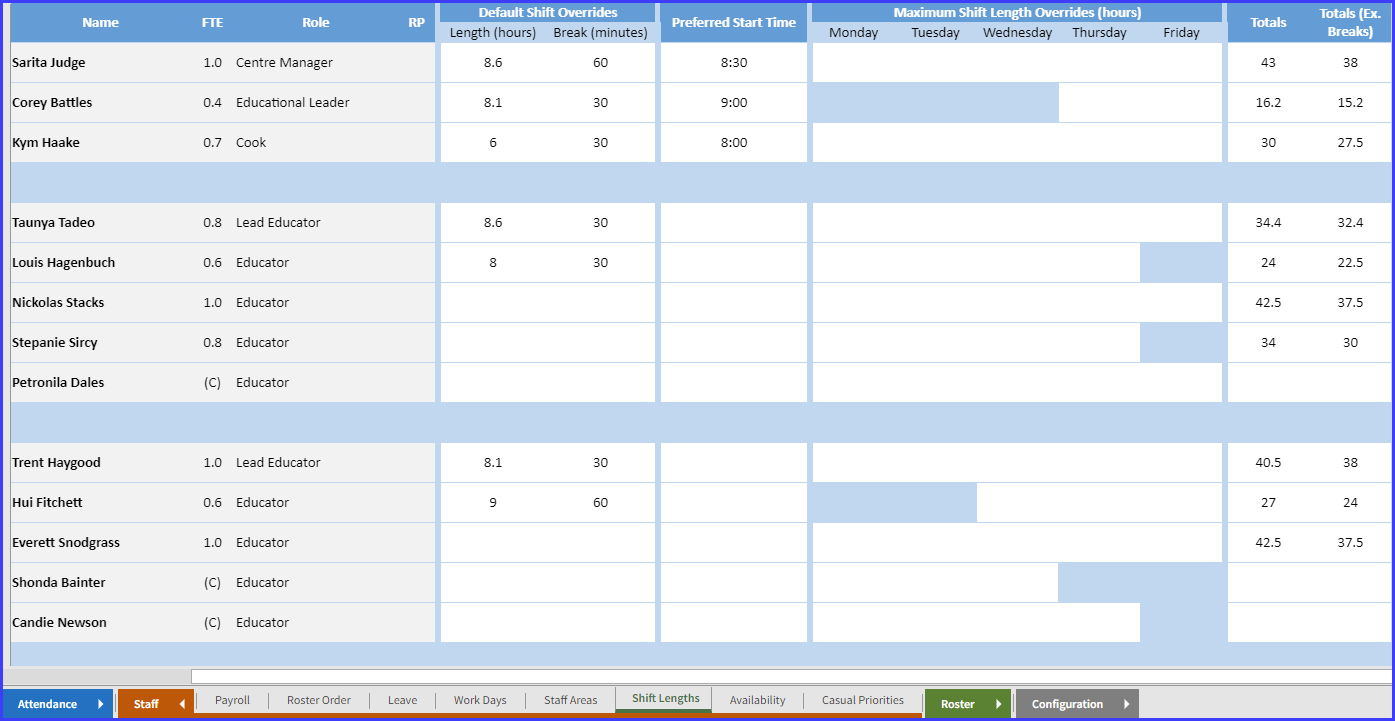
Shift Lengths are used to set lengths of shifts or breaks where they differ from the defaults for specific staff members as well as preferred start times.
Blue-blocked out cells indicate that the staff member doesn’t work on that day.
For casual workers, a Maximum shift length will be the most number of hours they can be rostered on for that day. For permanent workers, this will indicate the shift length they will be given.
Enter staff Availability
The Availability view is used to set the earliest start times and the latest finish times.
Select the Staff group

and then the Availability view
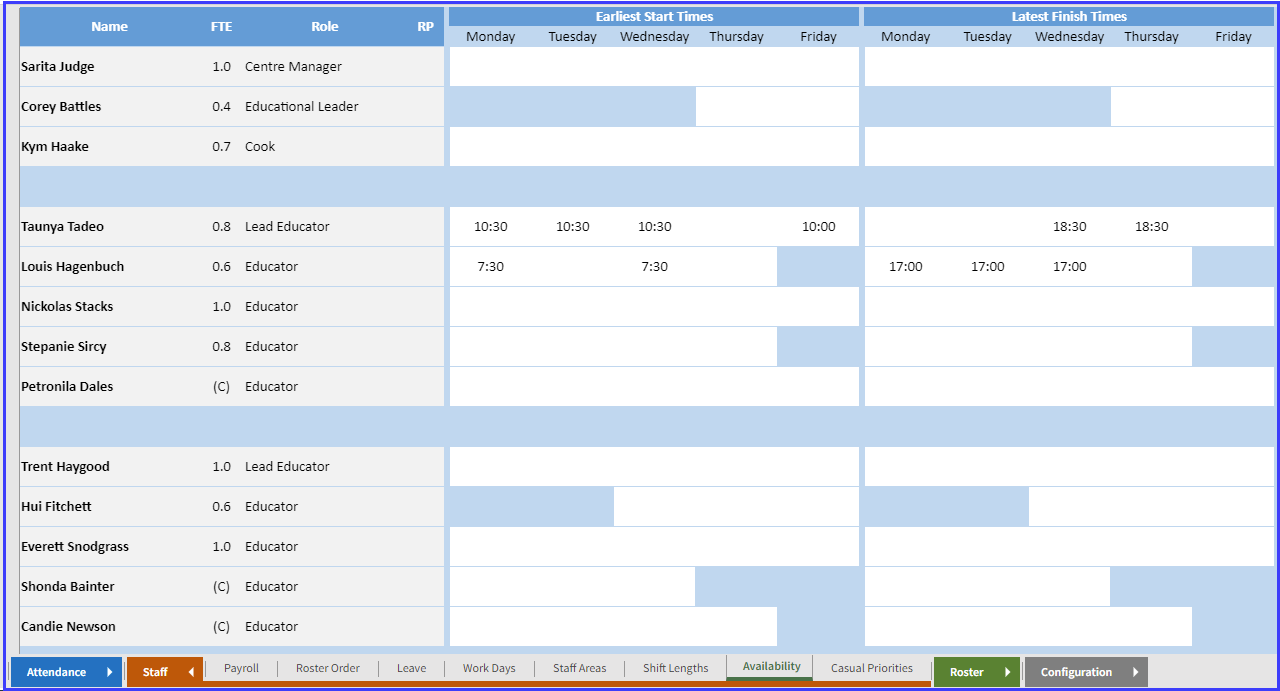
For any staff that cannot start earlier than a certain time or finish later than a certain time on a certain day, enter those days/times on this screen.
Other Duties
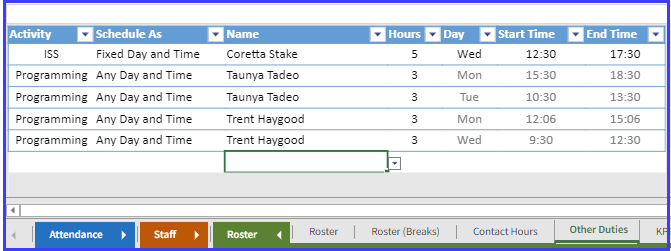
The Other Duties view allows you to schedule programming, planning studying or training time.
Select the Roster Group

and then the Other Duties view.
People will be rostered on during the hours you specify here but they will not be counted towards the quota during that time.
These activities do not display on the main roster view but do appear on the printed version.
Update this view with the programming or other duties planned for staff members for the week being rostered.
Enter the number of hours to spend on the activity and then they can choose from the following options:
Any Day and Time - Daitum will choose the best day and time for the activity
Fixed Day - You can select the day but Daitum will find a time on the day
Fixed Day and Time - You will enter the day and start time and end time of the activity.
Generating a roster
This is where you can generate the roster based on all the centre, staff, and attendance details provided in the other views.
Select the Roster Group

and then the Roster view.
Set the RP (Responsible Person) against the appropriate staff members by clicking in the RP column.
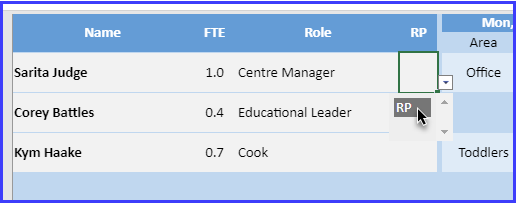
Set the date for the Monday of the week to be generated, the other dates for the week will update automatically.
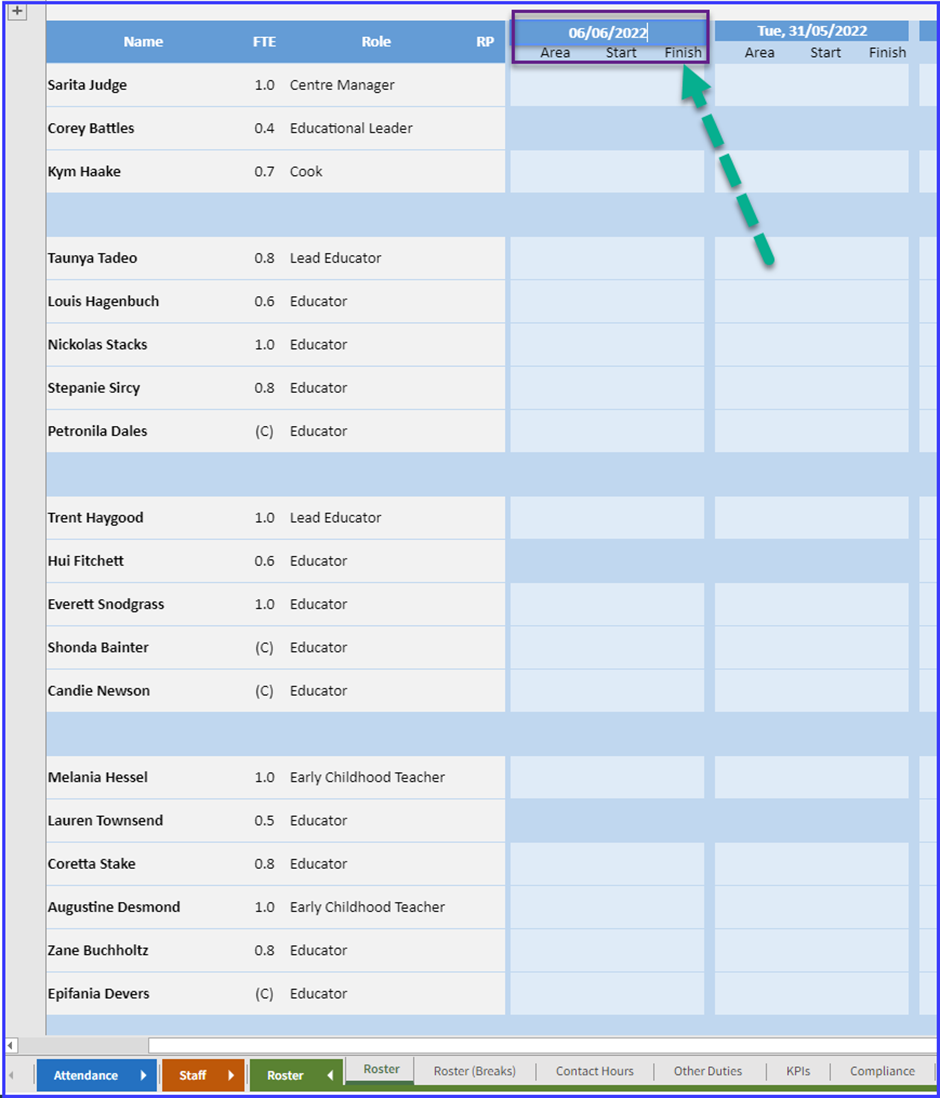
Then click the Daitum logo to begin generating the roster.
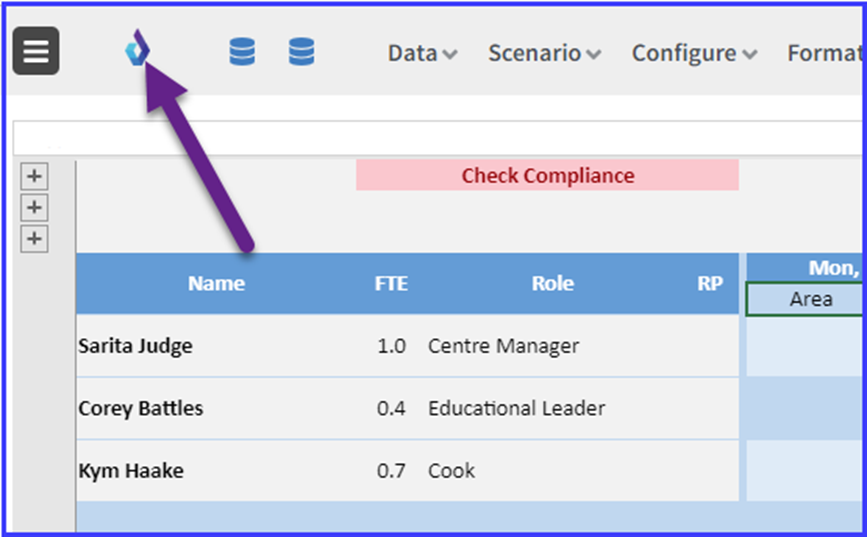
The roster will take between 10-15 minutes to generate. After that, the roster will be populated and can be reviewed and any changes required can be made manually as needed by editing the times and areas.
Roster Breaks
Breaks can be generated automatically by the system
Select the Roster Group

and then the Roster (Breaks) view.
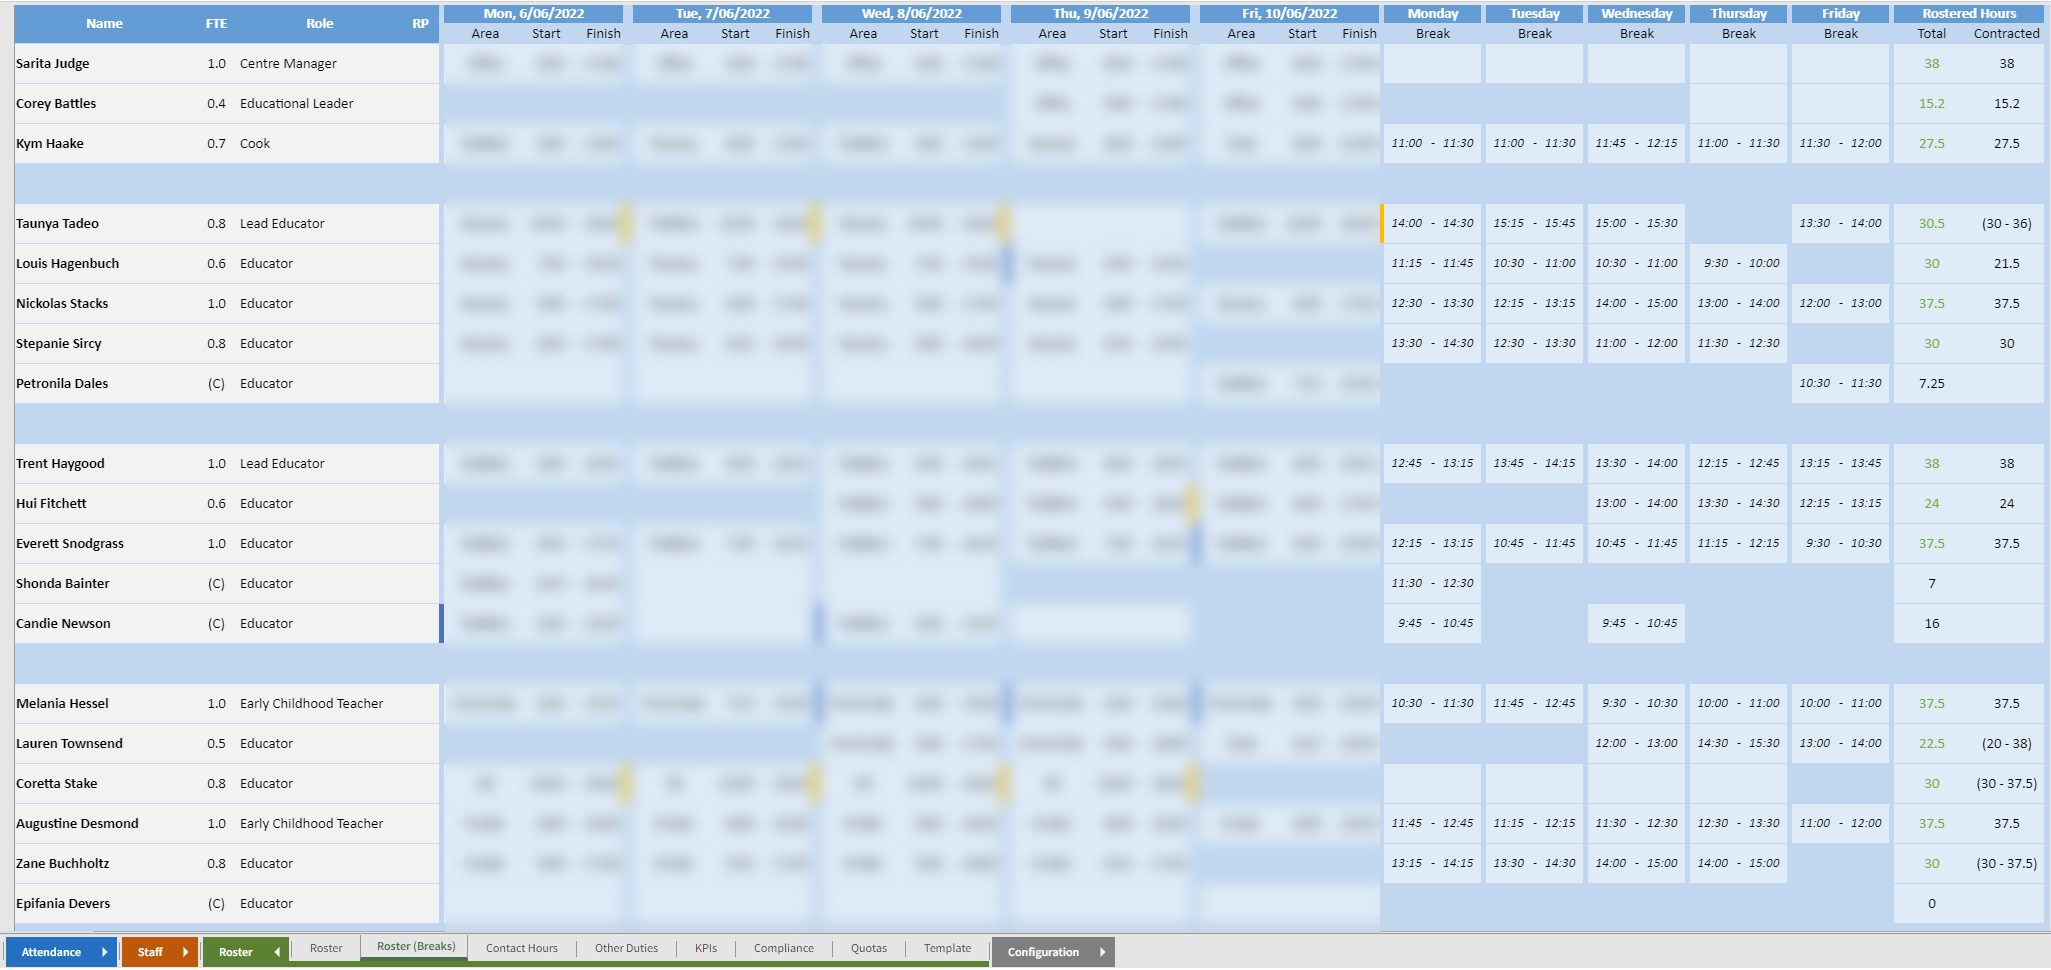
Break start times can be manually adjusted if need be. Break end times must not be manually adjusted, they are calculated based on the break length specified for that person.
Creating a roster template (only if using Templates)
After generating a roster, a template can be created by selecting Save as Template from the Data menu.
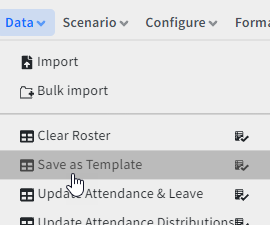
Afterwards, any rosters generated by Daitum will be based on the roster template. Casual shifts will be added and only minor changes made for permanent staff when generating new rosters.
For the template to be used, the Use Roster Template config setting must be set to TRUE in the Defaults view of the Configurations group. See Changing staff and centre default settings.
Next Steps
For subsequent weeks, follow all the steps outlined in the Weekly Checklist or the Weekly Step By Step Guide which has more detail in it.
Appendix A: Defaults
Changing staff and centre default settings
These various configuration views should be only adjusted by an Administrator within your organisation.
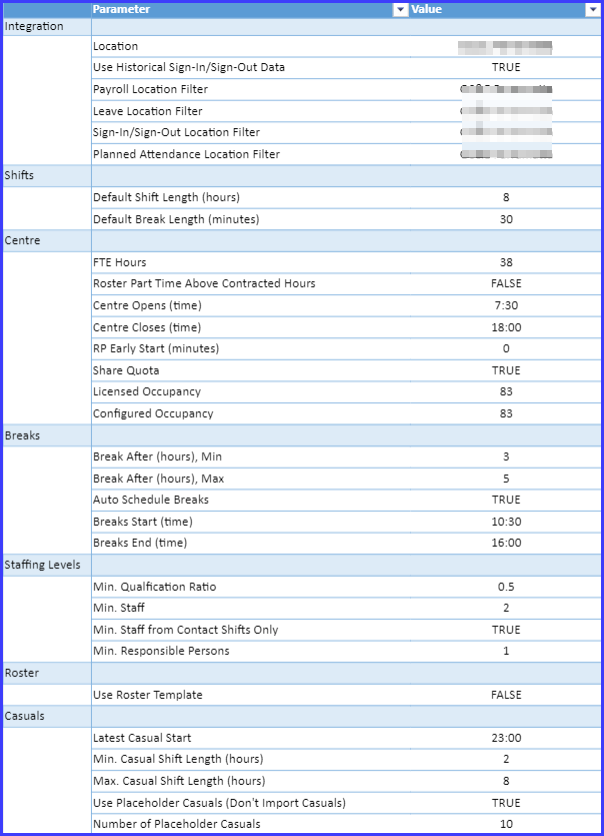
Below is an explanation of each setting
Intregation
Location
Used for exporting the roster to Human Force. This can be left blank if your centre does not use Human Force. Human Force needs to know which centre the roster is for and the value here should be set to the Human Force Location for the centre.
Use Historical Sign-In/Sign-Out Data
Set to TRUE if Sign-In/Sign-Out Data is available. Otherwise set to false and generic attendance patterns will be generated using a formula by the system.
Payroll Location Filter
Used for importing payroll data into Daitum. This should be set to your centre name as it appears in your payroll software.
Leave Location Filter
Used for importing leave data into Daitum. This should be set to your centre name as it appears in your leave/payroll software.
Sign-In/Sign-Out Location Filter
Used for importing sign in/sign out (SISO) data into Daitum. This should be set to your centre name as it appears in your SISO software.
Planned Attendance Location Filter
Used for importing planned/booked attendance data into Daitum for the week being rostered. This should be set to your centre name as it appears in your SISO software.
Shifts
Default Shift Length (hours)
The system will give every staff member a shift length of this number of hours. That is unless the staff member has a custom shift length defined in the Shift Lengths view.
This shift means the number of hours a person is rostered on to be present at the centre. In other words, breaks are taken during this time.
For example, if this is set to 8 hours, a person may be given a 9-5 shift. If the person has a 30 minute break they are working 7.5 hours during this time.
If a person has 22 Contracted Hours specified in Payroll this will likely be exceeded by the system giving them 7.5 hours of working time across three days, which makes 22.5 hours. The system tries to give the person the correct number of hours but is unable to do so because of the Default shift length specified here. Therefore, the person should be given custom shift lengths to override the default and correct this. Alternatively, the 22 contracted hours could be changed to 22.5.
Default Break Length (minutes)
In conjunction with the above setting, this defines the default break length for all staff unless a custom break length is defined for the staff member in the Shift Lengths view.
This represents a single unpaid break during the day.
Shorter paid breaks are not configurable in Daitum and should be managed by the centre manager.
Centre
FTE hours
The number of Full Time Equivalent hours, used for display purposes and other calculations. If a person is working 38 hours they are a 1.0 FTE.
Roster Part Time Above Contracted Hours
This setting controls what happens if Maximum hours is left blank for any part-time staff members in the Payroll view.
If Roster Part Time Above Contracted Hours is FALSE, part-time staff will only be rostered up their Contracted Hours. If it is set to TRUE they can be rostered up to Full-time hours as specified in the FTE hours setting.
If a maximum number of hours is specified for a staff member in the payroll view then that will be the maximum.
Centre Opens (time) / Centre Closes (time)
The times the centre opens and closes, no staff will be rostered on outside of these times unless the RP Early Start (minutes) is set to a value greater than zero. See below for more information. Times are in 24 hour format.
RP Early Start (minutes)
If there needs to be one responsible person arriving at the centre prior to the centre opening to set up and open, set the value here e.g. 15 and one RP will be rostered to start at 6:15 if the centre opens at 6:30.
Share Quota
If this is set to TRUE, older children in higher quotas can be counted towards lower quotas if there are free places.
For example, if there was one child over quota in the higher group, rather than put on an extra educator, that child would be counted as one of the younger children in the lower quota group if there are enough educators to mean that adding a child wouldn’t put them over quota. This is usually set to TRUE.
Licensed Occupancy
The number of places the centre is licensed for.
Maximum Occupancy
The maximum number of places that the centre can currently take. This will be the same or less than the licensed occupancy.
Breaks
Break After (hours), Max / Break After (hours), Min
These are only used if Daitum is scheduling breaks.
The minimum and maximum number of hours a person will work before being given a break. The award is between 3 and 5 hours. This can be adjusted within those times such as 3-4 hours or 4-5 hours, but it may result in more staff needing to be rostered on to cover more people taking their breaks at the same time.
Auto Schedule Breaks
Indicates whether Daitum will create a roster including break times.
Breaks Start (time) / Breaks End (time)
These are only used if Daitum is not scheduling breaks.
These settings are used to ensure enough people are rostered on during these hours so that breaks are able to be covered when they are taken. Times are in 24 hour format.
Staffing Levels
Min. Qualification Ratio
Default 50%
Under regulation 126 of the Education and Care Services National Regulations, 50% of educators required to meet the relevant educator to child ratios in centre-based services with children preschool age and under, must have, or be actively working towards, an approved diploma level education and care qualification (or higher).
Daitum will look at the qualifications specified for each staff member and ensure the qualification ratio is met.
Min. Staff
The minimum number of staff who should be rostered on at any time.
Note: This will not apply to the RP Early Start setting above. If an RP Early Start is set to have a responsible person arrive at the centre only, only that one person will be rostered on for that time.
Min. Staff from Contact Shifts Only
When TRUE, the minimum staff setting will apply to only those staff members working on the floor. A Chef or Admin worker would not be included in the Minimum Staff count.
Min. Responsible Persons
The minimum number of responsible persons who should be rostered on at any time.
Roster
Use Roster Template
When set to TRUE, if a Roster has been saved, the system will attempt to use the template as a starting point for the roster. It will try and keep shifts the same as the template for permanent staff and only change the shifts for casual staff each week. Any differences between the roster generated and the saved template will be highlighted.
A generated roster can be saved as a template from the Data Menu.
A saved roster can be viewed from the Template view in the Roster group.
Casuals
Latest Casual Start
The latest time of day that a casual staff member may be rostered on to start
Min. Casual Shift Length (hours)
The minimum number of hours a casual staff member may be rostered on for.
Max. Casual Shift Length (hours)
The maximum number of hours a casual staff member may be rostered on for.
Use Placeholder Casuals (Don't Import Casuals)
Indicates whether, when importing staff details from an external system such as Human Force, casuals should not be brought in. This should be TRUE if managing casuals outside of Daitum but you still want to see which shifts should be given to a casual worker.
Number of Placeholder Casuals
Daitum can automatically bring in a number of un-named casuals. These can be given shifts so the user can see which casual shifts are needed to be filled, even though the casual worker filling the shift might be currently unknown.
