Frequently Asked Questions
This page aims to provide answers to the most frequently asked questions about common operations within Daitum.
Staff
How do I add a new staff member?
Ensure the staff member is included in the Staff → Payroll view, either by importing the latest payroll data or adding the person manually.
Manually, a staff member can be added by doing the following:
Right-click on an existing staff member.
From the menu select Insert, Table Rows Above or Table Rows Below options.
Enter any unique number for the Code field and fill out the rest of the details for the employee.
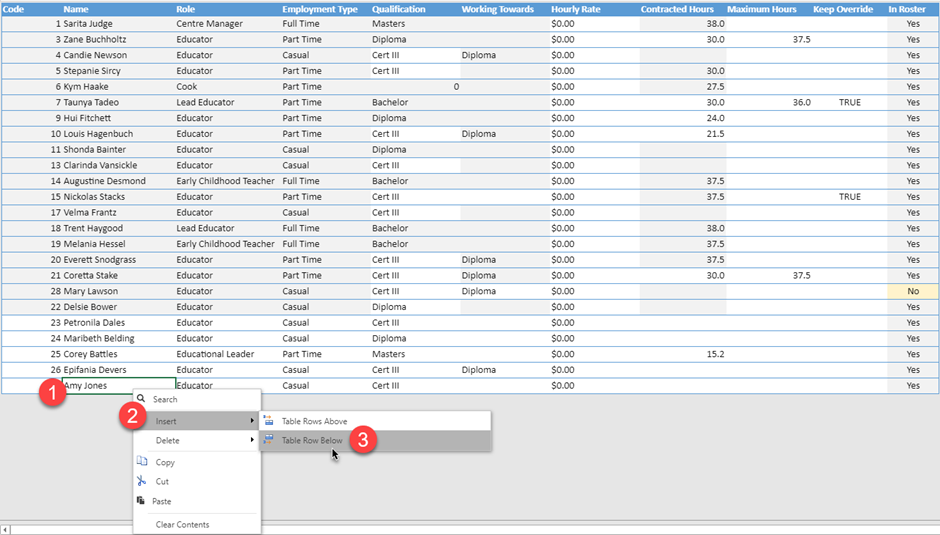
Enter the details in the new blank row at the bottom, you can press the tab key to move from one field to the next.
Note: If the person should not be removed from the payroll view the next time data is imported. Set the Keep Override field to TRUE (see Taunya and Nickolas in the screenshot above as an example).
The payroll view should look like this with the new person (Lauren in this example ) appearing at the bottom
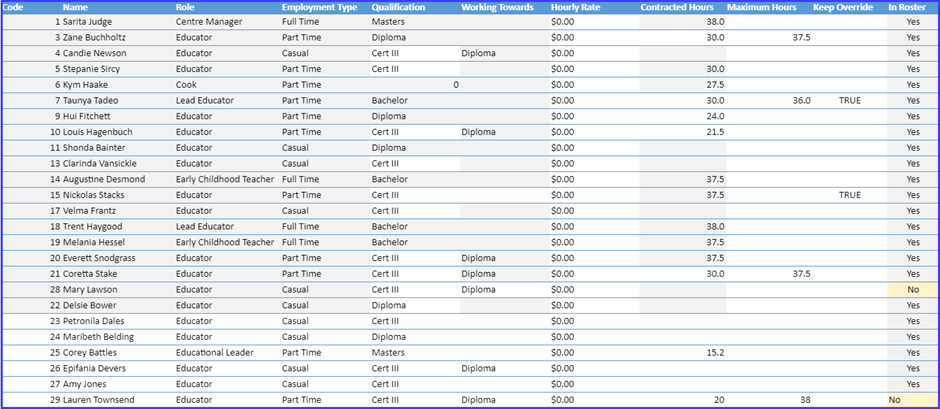
Notice that Lauren has a No in the In Roster column which indicates that she is not yet on the roster.
Therefore, we will need to add her to the Roster Order view and update the Roster Layout. See How do I change the look or order of the roster?
Here is a video tutorial:
How do I remove a staff member?
Start by importing the latest payroll data or by removing the person manually from the Staff → Payroll view.
Manually, a staff member can be removed from the Staff → Payroll view by doing the following:
Right-click on the staff member to be removed.
From the menu select Delete, Table Rows.
Then remove the person from the Staff → Roster Order view and update the Roster Layout. See How do I change the look or order of the roster?
This will mean that the staff member does not appear in a generated roster.
Here is a video tutorial:
How do I flag someone as being a Responsible Person?
From the Roster → Roster view open the drop-down under the RP column and select RP

How do I schedule some time for programming or other activities?
Add an entry for the person using the Roster → Other Duties view.
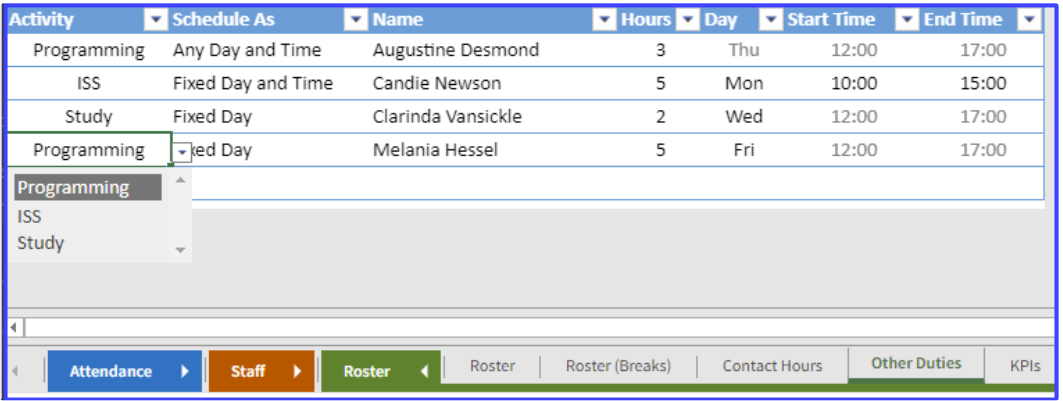
You can select the Activity, the person who will do the activity and the number of hours to schedule.
Then in the Schedule As column, you have the option to choose from one of the following options:
Any Day and Time - Daitum will choose the best day and time for the activity
Fixed Day - The user selects the day but Daitum will find a time on the day
Fixed Day and Time - The user will enter the day and times of the activity.
After generating the roster, you can return to this screen to see the day and time that Daitum has generated for this activity by examining the values in the Day and Start Time and End Time columns.
What are Floats?
When staff are rostered as a Float, it means those staff members are able to move about anywhere in the centre during their shift as needed, for example, to provide break cover for others.
It is recommended that most staff are not assigned a Float as their first preference in Staff → Staff Areas. Instead, staff areas can be left blank for those staff who do not work in a specific room. That way, the optimiser will assign them rooms or to a floating shift as needed.
Floating shifts can be assigned as a secondary or alternate room option for permanent staff members including those in non-contact roles, such as Centre Manager or Assistant Centre Manager, who also do a few hours per week of contact time.
For any staff members with a Float as an option, the Prefer First Area should be set to TRUE as shown below which will ensure they are usually placed in their first room choice but may be assigned as Floats on occasion if needed.

If there are specific staff members who will always cover breaks, they can be assigned as floats in this view as their first option.
Roster Creation
How do I create a new roster for a new week?
In the model browser, take a copy of a previous week’s roster by selecting the previous roster and then using the Copy and Paste options from the Edit menu.
Then rename it and change the name to reflect the date of the new week.
Then open the new roster and follow all the steps outlined in the Weekly Checklist.
Tip: Using a naming format of YYYY.MM.DD e.g. 2022.01.17 will keep rosters in date order.
How do I generate a roster?
Once all the staff details and planned attendances have been entered and the first date of the roster has been entered for the first Monday of the week, click the Daitum logo and wait for the roster to be created.

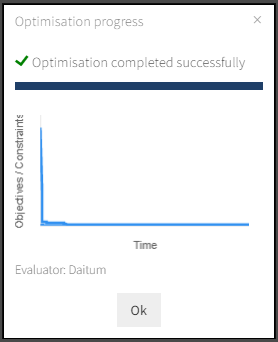
Roster creation takes approximately 10-15 minutes. Wait until the progress bar reaches the end and then click Ok to view the roster.
How do I make manual changes to a roster?
After the roster has been generated, make any edits on the roster page (Roster → Roster)
To remove a shift, click on the room/area and press the delete key.
To change shift times, click on the time to be changed, then enter a new time and press Enter.
After making changes, view the charts by clicking the two plus signs in the top-left corner of the roster to ensure there are no red areas which indicate understaffing or large yellow areas which indicates overstaffing. See the purple arrow in the screenshot below as an example of something to look out for.

How do I download or print the roster?
From the Data menu, select Report Roster Report.
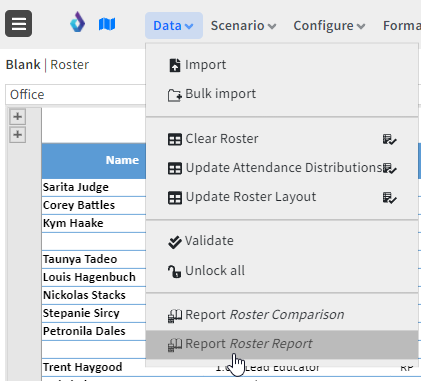
An excel spreadsheet copy of the roster will be downloaded and can be printed or emailed.
How do I change the look or order of the roster?
Go to Staff → Roster Order
Add or remove entries or an empty row by using the context menu (right-click) and selecting Insert or Delete
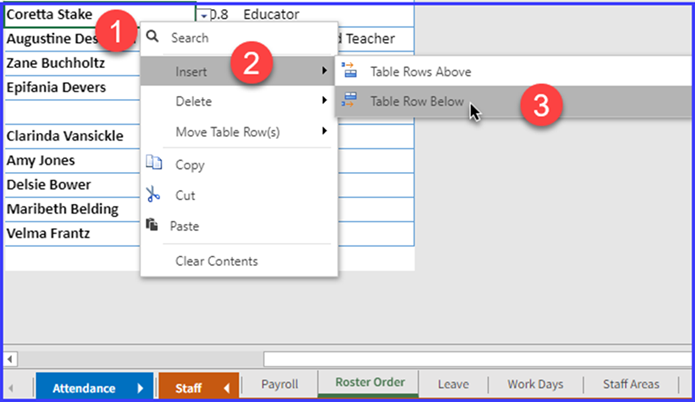
You can also change the order of staff members using Cut and Paste functions from the right-click menu.
You can also use the Move Table Row(s) function as well.
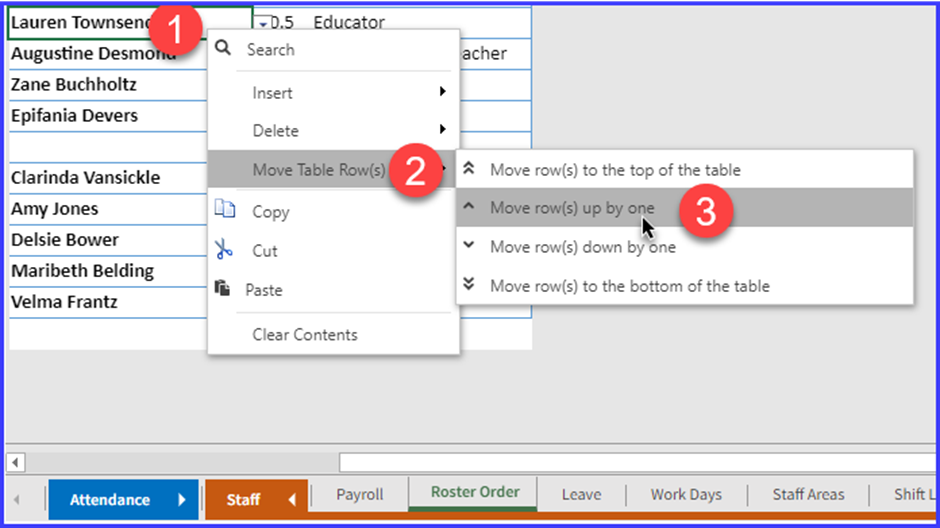
Important: update the roster layout
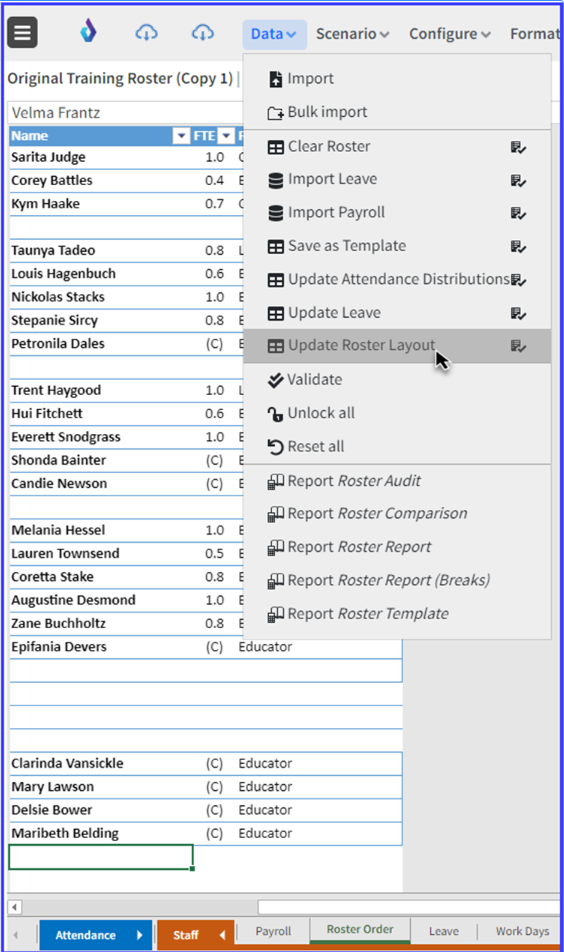
Áfter making any changes to the roster layout, you will need to run the update the roster layout process.
This can be easily done by selecting Update Roster Layout from the Data menu.
How can I regenerate a roster but make sure certain shifts will remain in the newly generated roster?
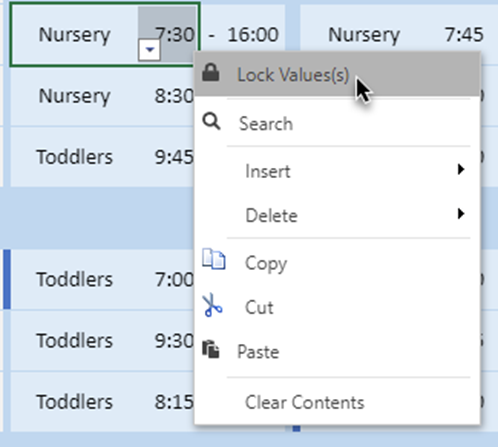
It is possible to lock certain entries to ensure they do not change. Right-click on the cell and select Lock Value(s)
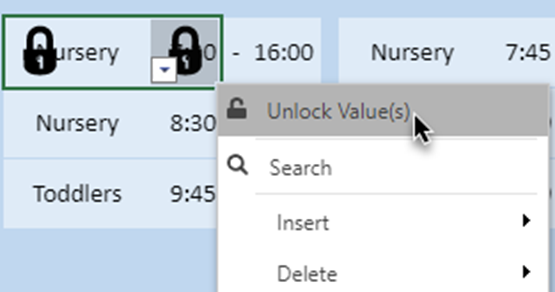
Values can be unlocked using the same method.
How do I create a Roster template in Daitum?
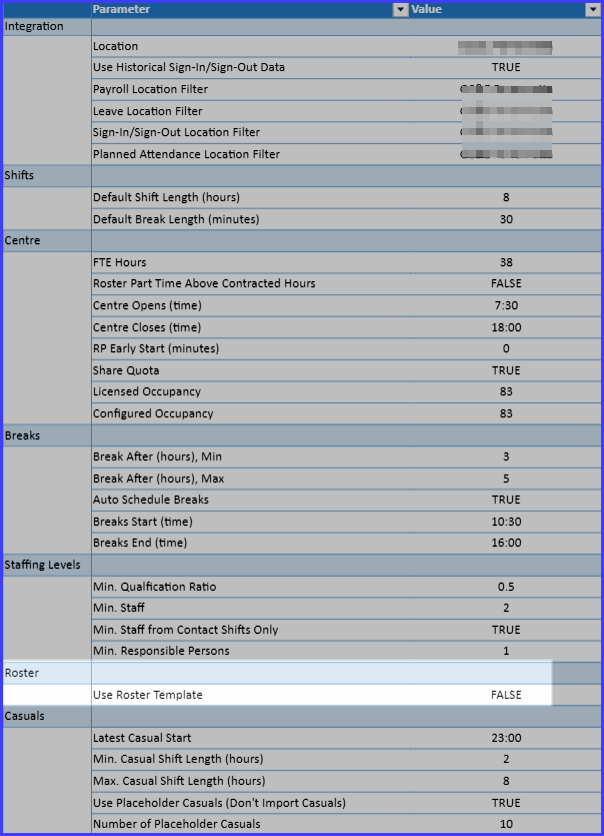
Start by setting the Use Roster Template config setting to FALSE in the Defaults view of the Configurations group.
Then generate a roster, and make any desired manual adjustments to full-time and part-time staff shifts (casuals are not included in the template).
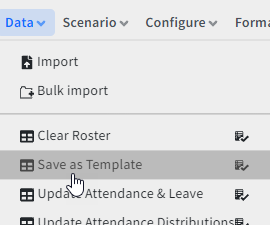
Save the new roster as a template by selecting Save As Template from the Data menu.
Check the Roster template looks correct by viewing it from the Template view in the Roster group.
Set the Use Roster Template config setting back to TRUE.
When should I update or change the Roster template in Daitum?
When any permanent staff members join or leave the childcare centre.
When new SISO data is imported manually or once a month if importing happens automatically.
How do I control when breaks can be scheduled and how long they are?
A config setting in the Defaults view of the Configurations group determines when breaks are scheduled. The default setting is that breaks can be scheduled between 3-5 hours, as per the award. However, if breaks are being scheduled too early or too late you may consider adjusting this to 3-4 hours or 4-5 hours. Keep in mind that this may result in more staff needing to be rostered on in order to cover more people going on break at the same time.
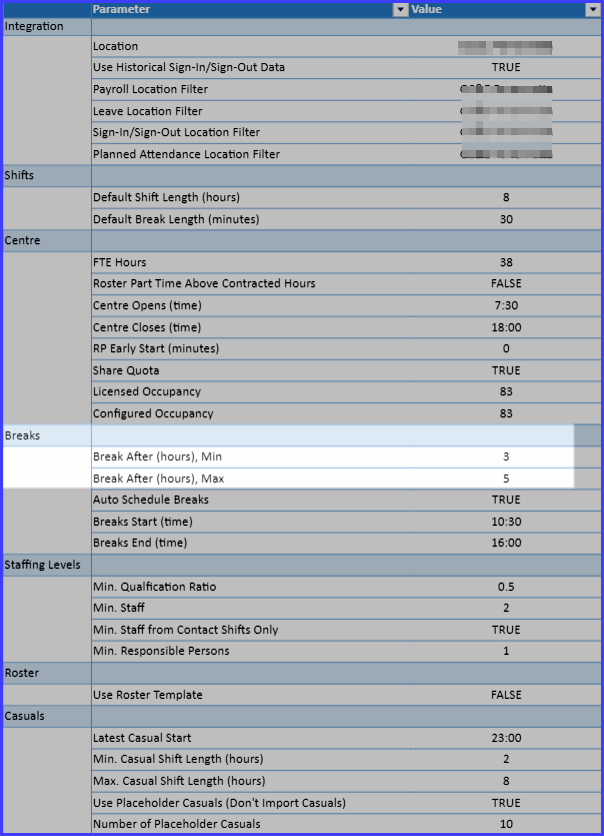
The length of a break is determined by the Default Break Length (second option in the screenshot above). That is unless the break length has been overridden for that staff member in the Staff → Shift Lengths view.
If needed, a break time may be manually adjusted on the roster by changing the break start time, the end time will be automatically calculated.
